With the recent announcement that VMware Fusion (and Workstation Pro) are now free for personal use, many might be looking to import their Parallels VMs into Fusion. Sadly, the import functionality relied on OVFTool which doesn’t work on Macs with Apple Silicon, therefore the import functionality has been removed from the product and isn’t present in the File menu like it would have been with previous x86 versions.
The steps below worked for my Windows 11 VM. In testing some Linux distributions appear not to be working, I hope to look into this soon.
First, I had to install VMTools on the existing VM for the NIC to be recognised post import into Fusion, I needed this for Internet connectivity to be able to reset my Windows account PIN. If you’re using a local account or Linux, you may not have to do this step.
Using the qemu-img CLI tool, you can convert the Parallels HDD into a VMDK, then use that as an existing disk for a new Fusion Pro VM.
First, if you don’t have Homebrew installed, run this one liner from your preferred terminal app:
/bin/bash -c "$(curl -fsSL https://raw.githubusercontent.com/Homebrew/install/HEAD/install.sh)"I admit it’s been some time since I installed it, so I’m not too sure how long it takes. The official documentation will have more information.
Once Homebrew is installed, run the following command:
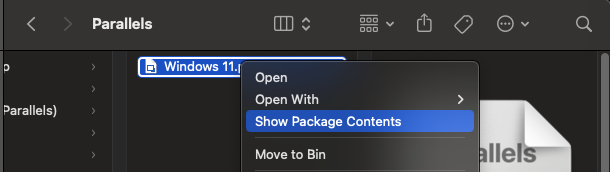
brew install qemuThen using Finder, navigate to your Parallels VM folder, right click on the VM you want to import then show package contents. Do this step again for the .hdd file for the VM.
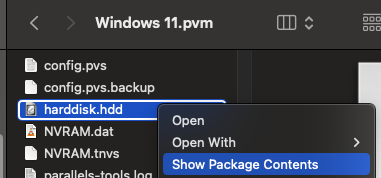
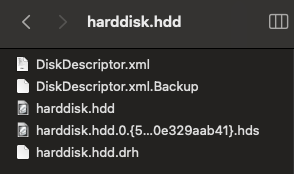
In this folder, there should be a .hds file, copy that and paste it somewhere. I used the Parallels directory.
Then run the following command, replacing the hard disk name with whatever the .hds file is called (hint – use tab to autocomplete).
qemu-img convert -f parallels -O vmdk your_hard_disk_name.hds win11.vmdkThe process might take a short while to complete. Once done, open Fusion Pro and create a custom VM. Move through the menu system until you get the option to select an existing disk, and then point it at the file from the output of the command above (win11.vmdk in this case).
Fusion will then copy the file into the new VM directory. Finish the wizard, and power on the VM. Check everything works as it should, and don’t forget to remove Parallels tools, plus the hds and vmdk files from the Parallels directory you copied/created earlier. If something goes wrong, you can always just switch back to the Parallels VM.
Hopefully this helps some people out.
hi
thanks so much for the tutorial
i followed it but im having issues with the ethernet adapter… havent been able to get internet in the converted vm
i already removed parallels tools and installed vmware tools but its not working.
do you have any idea what its wrong?
i can send photos
thanksss
Hi, you may have to remove the existing adaptor and add a new one.
Worth updating to include the optional step of merging snapshots into a single hds file using the `prl_disk_tool merge –hdd ` command
Doesn’t work with Kali?
Worked like a charm, thanks! Just a little note, even though it is obvious: if you don’t disable the Parallels disk encryption beforehand, the conversion will “succeed” but you won’t be able to boot from the hard drive.
Then, the only fix I needed to make in the VM is :
$ sudo nano /etc/netplan/
change the “enp0s5” interface from Parallels to “ens160” from VMWare, then
$ sudo netplan apply
Other than that, works perfectly and was able to re-enable encryption in VMWare
Worked like a charm. Thanks for posting this (especially now that Fusion Pro is free for any purpose whatsoever now…I’m a .Net/Azure dev who recently ditched Windows for Mac, but I do still need access to Windows.)
I was able to follow all steps. But when I boot the Windows XP vm, it gives me these errors:
PXE-E53: No boot filename received
PXE-M0F: Exiting Intel PXE ROM.
Operating System not found
Can you help? Thank you.