Update 26/07/23 – if you are running 3.1.x then follow my updated post here: https://chrisdooks.com/2023/06/26/configure-bgp-on-a-unifi-dream-machine-udm-v3-1-x-or-later/
Update 23/07/23 – it seems UniFi are now bundling FRR into their UDM to support UniFI Site Magic – source. I’ll create a new blog post soon, essentially you just need to enable the BGP daemon in /etc/frr/daemons and then append your BGP config to the frr.conf file. If you don’t make use of the Site Magic VPN feature, you’ll need to start the service with service frr start. I’m still testing the functionality, once done I will update and make a new post.
Update 29/10/2022 – this does NOT survive a firmware update. I’ll endeavour to work out how to keep this persistent. My current working theory is to add frr and frr-pythontools to /etc/default/ubnt-dpkg-cache:
Update 21/02/2023 – I should also add that this does NOT support ECMP. If you have a single NSX Edge then it will work fine, but anything that’s more complicated such as an Active/Active Edge design in your lab, this will not work. Thanks to Eagle_B5 in the comments for pointing this out.
root@UDM-SE:/etc/frr# cat /etc/default/ubnt-dpkg-cache
DPKG_CACHE=yes
DPKG_CACHE_DEBUG=yes
DPKG_CACHE_APT_UNPACK=yes
DPKG_CACHE_APT_REMOVE_AS_PURGE=yes
DPKG_CACHE_UBNT_PKGS="unifi unifi-protect ulp-go unifi-access unifi-talk unifi-connect uid-agent frr frr-pythontools"
This post is a work in progress. I can’t guarantee that this will work through a reboot This works through a reboot but might not after firmware upgrade, so make sure to back up the config files. I’ve also not extensively tested it so I don’t know if it has any inadvertent effects on the UniFi OS or its applications. This is also completely unsupported by Ubiquti so proceed at your own risk. I will endeavour to update once I’ve done some further testing. If you end up with a bricked device, do not blame me is what I’m saying! To back out, if all else fails, factory reset the SE. It goes without saying that you should create a backup before proceeding.
Ubiquiti recently released version 3 of their UniFi OS for the UniFi Dream Machine Special Edition. Currently, it’s in Early Access, but it brings with it some decent improvements including policy based routing (over VPNs) as well as native Wireguard support (finally!). Policy based routing certainly needs some polish but it works well to send traffic from a specific device or subnet down a VPN tunnel. It would be nice to see the addition of application detection and then route down via VPN like Untangle can. Perhaps this is coming. Anyway, I digress.
Everything on the SE runs on metal and does away with Podman containerisation. This is true of 2.x releases as well as the latest 3.x release. I previously had BGP working by running FRR in a Podman container, however I can’t get Podman working with the SE due to the OS uplift to Debian 11 (Bullseye). From the reading I’ve done, this is because it uses cgroups2 as its default cgroupmanager, rather than cgroups1 which OS 2.x used. cgroupsv2 uses a specific kernel module which the new kernel does not have. It looks as if installing it on metal is the only way forward (for now).
I used the documentation on the FRR site to get it up and running, although you can use the below for quick reference.
# add GPG key
curl -s https://deb.frrouting.org/frr/keys.asc | sudo apt-key add -

# possible values for FRRVER: frr-6 frr-7 frr-8 frr-stable
# frr-stable will be the latest official stable release
FRRVER="frr-stable"
echo deb https://deb.frrouting.org/frr $(lsb_release -s -c) $FRRVER | sudo tee -a /etc/apt/sources.list.d/frr.list

# update and install FRR
sudo apt update && sudo apt install frr frr-pythontools
This will install FRR and enable as a service. Once installed, edit /etc/frr/daemons and ensure that bgpd is enabled:
zebra=no
bgpd=yes
ospfd=no
ospf6d=no
ripd=no
ripngd=no
isisd=no
pimd=no
ldpd=no
nhrpd=no
eigrpd=no
babeld=no
sharpd=no
staticd=no
pbrd=no
bfdd=no
fabricd=no

#
# If this option is set the /etc/init.d/frr script automatically loads
# the config via "vtysh -b" when the servers are started.
# Check /etc/pam.d/frr if you intend to use "vtysh"!
#
vtysh_enable=yes
zebra_options=" -s 90000000 --daemon -A 127.0.0.1"
bgpd_options="   --daemon -A 127.0.0.1"
ospfd_options="  --daemon -A 127.0.0.1"
ospf6d_options=" --daemon -A ::1"
ripd_options="   --daemon -A 127.0.0.1"
ripngd_options=" --daemon -A ::1"
isisd_options="  --daemon -A 127.0.0.1"
pimd_options="  --daemon -A 127.0.0.1"
ldpd_options="  --daemon -A 127.0.0.1"
nhrpd_options="  --daemon -A 127.0.0.1"
eigrpd_options="  --daemon -A 127.0.0.1"
babeld_options="  --daemon -A 127.0.0.1"
sharpd_options="  --daemon -A 127.0.0.1"
staticd_options="  --daemon -A 127.0.0.1"
pbrd_options="  --daemon -A 127.0.0.1"
bfdd_options="  --daemon -A 127.0.0.1"
fabricd_options="  --daemon -A 127.0.0.1"

#MAX_FDS=1024
# The list of daemons to watch is automatically generated by the init script.
#watchfrr_options=""

# for debugging purposes, you can specify a "wrap" command to start instead
# of starting the daemon directly, e.g. to use valgrind on ospfd:
#   ospfd_wrap="/usr/bin/valgrind"
# or you can use "all_wrap" for all daemons, e.g. to use perf record:
#   all_wrap="/usr/bin/perf record --call-graph -"
# the normal daemon command is added to this at the end.
Then create /etc/frr/bgpd.conf with your required configuration, here is mine:
hostname UDM-SE
frr defaults datacenter
log file stdout
service integrated-vtysh-config
!
!
router bgp 65001
 bgp router-id 172.16.72.254
 neighbor 172.16.72.1 remote-as 65000
 neighbor 172.16.72.1 default-originate
 !
 address-family ipv4 unicast
  redistribute connected
  redistribute kernel
  neighbor V4 soft-reconfiguration inbound
  neighbor V4 route-map ALLOW-ALL in
  neighbor V4 route-map ALLOW-ALL out
 exit-address-family
 !
route-map ALLOW-ALL permit 10
!
line vty
!
Once done, change the owner of the file to frr:frr
chown frr:frr /etc/frr/bgpd.confIt’s a very simple configuration which will work with a NSX Tier 0 router and advertise a default route to it.
Next, empty vtysh.conf and delete frr.conf. Finally, restart frr:
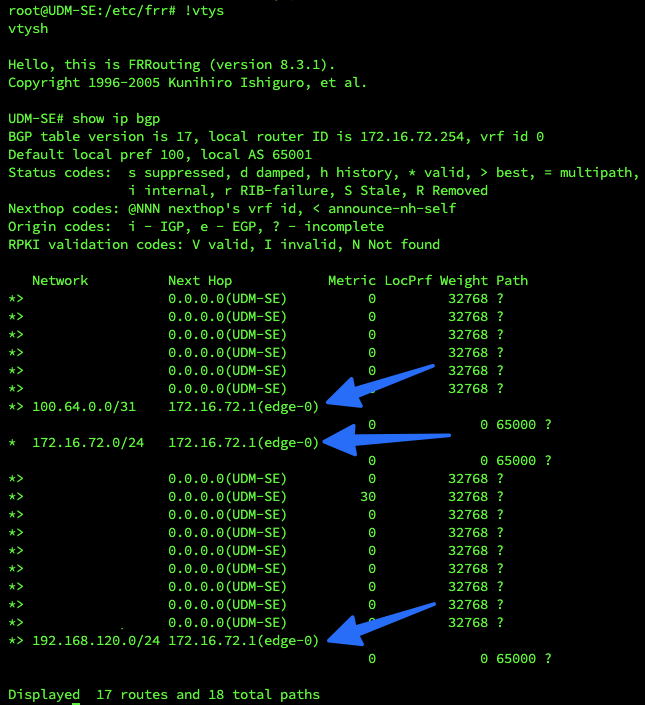
service frr restartProvided you have NSX configured correctly, you should be able to enter the vtysh shell and see routes.
Let me know how you get on and it’s working for you. I’ve done a single reboot to test and it was fine but I definitely need to do more testing.
Did this finally work? Need BGP on my UDMP SE, too.
Hi Markus, yes it works and survives a reboot. However it does not survive a firmware upgrade, that’s something I need to look into. The config files remain in /etc/frr/ so all that is needed after a firmware upgrade is to re-install the package, then remove frr.conf and empty vtysh.conf. Once done, restart the FRR service ‘service frr restart’. Hope this helps and thanks for commenting.
Thank you for this guide, really helpful because running frr as a container didn’t worked for me 🙁 Nevertheless, BGP routes won’t be updated in the kernel of the UDM (SE). Do you have an idea how to get those updated in the kernel?
Hi, how would I check that? I can ping into my NSX environment from outside of the UDM.
I’m running UDM SE v3.0.13 and by BGP configuration looks like
UDM-SE# show run
Building configuration…
Current configuration:
!
frr version 8.4.2
frr defaults traditional
hostname UDM-SE
domainname localdomain
log file //stdout
!
router bgp 65000
bgp router-id 192.168.1.1
timers bgp 4 12
neighbor zrh-m01-ec01 peer-group
neighbor zrh-m01-ec01 remote-as 65010
neighbor zrh-m01-ec01 bfd
neighbor 172.16.5.11 peer-group zrh-m01-ec01
neighbor 172.16.5.12 peer-group zrh-m01-ec01
neighbor 172.16.6.11 peer-group zrh-m01-ec01
neighbor 172.16.6.12 peer-group zrh-m01-ec01
!
address-family ipv4 unicast
neighbor zrh-m01-ec01 next-hop-self
neighbor zrh-m01-ec01 default-originate
neighbor zrh-m01-ec01 soft-reconfiguration inbound
neighbor zrh-m01-ec01 route-map ALLOW-ALL in
neighbor zrh-m01-ec01 route-map ALLOW-ALL out
maximum-paths 8
exit-address-family
exit
!
route-map ALLOW-ALL permit 10
exit
!
end
UDM-SE#
If I run “netstat -ar” I don’t see the routes being advertised (“show ip bgp” shows all routes, BGP sessions are established) by my NSX components. 🙁 thus, I can’t ping any component in my overlay networks.
You must have a config issue somewhere, I see an NSX Segment in netstat -ar.
Do you have route advertisement enabled for both Tier-1 and Tier-0 within NSX?
Guess I found a UDM limitation here: As long as you only advertise your routes through a single VLAN (interface) to the UDM, the kernel routing table gets updated.
However, if you use multiple VLANs for redundancy and leveraging ECMP, no routing table updates anymore.
I use two Edge VMs with an Active/Active Tier-0 and one Uplink VLAN but there is only routing entry for the advertised networks. Looks like ECMP isn’t supported at all on UDM 🙁 if ECMP worked, there should be a second GW IP for each subnet, like 172.16.5.11 in my example, in the routing table. But at least it’s working now.
root@UDM-SE:~# netstat -ar
Kernel IP routing table
Destination Gateway Genmask Flags MSS Window irtt Iface
…
172.16.128.0 172.16.5.12 255.255.255.0 UG 0 0 0 br1605
172.16.129.0 172.16.5.12 255.255.255.0 UG 0 0 0 br1605
…
root@UDM-SE:~#
Ah, I hadn’t considered that it wouldn’t support ECMP, I only run a single Edge. Good to know, thanks for the update. I’ll add that in the post later today.
I think I’ve worked out an approch that achieves ‘persistence’ of FRR, Chris. I’ve set up on-boot to check whether it is installed, and if not set it up again.
Check out https://www.map59.com/ubiquiti-udm-running-bgp/
I’ve not yet done an OS upgrade beyond 3.0.20, but in theory the approach should work.
Hi Steve, thanks for this, I’ll definitely check it out.
Hi Steve, I updated to UDM SE v3.1.9 today, and the FRR config remained, thanks for the tip!