I see this question come up often both in the field and internally. VMware’s public documentation on this covers most detail but the first time I configured HCX to use an AWS Direct Connect (DX) I was left with some questions.
Before we dive in any further, we should cover some AWS DX basics. In short, it is a private ethernet circuit which can be leased which connects your on-prem infrastructure directly into AWS via a 3rd party provider, such as BT, Digital Realty etc. This DX will terminate within your AWS account and from here you can attach it to your SDDC.
Once attached you can configure your on-prem router to exchange routes using the auto generated ASN. Any Segment which is created in an SDDC is automatically advertised using BGP over the DX to your on-prem router(s). You can also advertise routes from on-prem to the SDDC to allow traffic to flow. The main benefit of using a DX is that it doesn’t traverse the public internet, so it offers a high bandwidth, low latency private circuit between on-prem and VMC on AWS.
I haven’t gone into a great amount of detail above as the point of this post is mainly focussing on how we can use HCX with a DX. By default, when HCX is deployed it will be assigned public IPs against a network profile called ‘externalNetwork’. This network profile is in use by the default SDDC Computer Profile ‘ComputeProfile(vcenter)’ as its uplink interface. If you have a DX and you go to configure a Service Mesh from on-prem, unless you specifically change the SDDC Network and Compute Profiles, HCX traffic will flow over the public internet. Whilst the traffic is secured with IPSEC, this might not represent the best option, especially if you have a high bandwidth and low latency DX available to use.
In order to take advantage of using the DX for HCX, we must first define an IP range against the default ‘directConnect1’ Network Profile and then change the default Compute Profile to use it as its uplink interface. Once this is done, we can then deploy a new Service Mesh which then uses the DX for traffic.
The public documentation is located here, and here are the main steps copied and pasted directly from the article:
The private virtual interface allows VMware HCX migration and network extension traffic to flow over the Direct Connect connection between your on-premises or cloud source environment and your destination SDDC.
Caution: Ensure the IP Address Range configured does not overlap with the VMware Cloud on AWS management subnet CIDR block or any other IP range already in use for services in VMC. Overlap can cause routing and network reachability issues for those other components.
Prerequisites
The AWS Direct Connect with Private Virtual Interface is only supported on VMC SDDC backed by NSX-T networking.
The SDDC must be configured to use the Direct Connect Private Virtual Interface.See Using AWS Direct Connect with VMware Cloud on AWS.
A private subnet that can be reached from on-premises over the Direct Connect with Private VIF, ideally reserved for VMware HCX component deployments.
Procedure
Log in to the VMC Console at vmc.vmware.com.
Select your organization and data center (SDDC).
Select Add Ons.
Click OPEN HCX on the HCX card.
Navigate to the SDDC tab and click OPEN HCX.
Enter the [email protected] user and credentials and click LOG IN.
Navigate to the Infrastructure > Interconnect.
Click the Network Profiles tab.
In the Direct Connect network profile template, click Edit.
Enter the private IP address ranges reserved for VMware HCX.
Enter the Prefix Length and the Gateway IP address.
Click Update.
Results
When the Service Mesh is deployed, it uses the Uplink Network Profile, private IP addresses assigned by the user. The assigned IPs are reachable over the AWS Direct Connect.
There are two key parts of these instructions I want explain a little further here. First of all, the Caution element which states “Ensure the IP Address Range configured does not overlap with the VMware Cloud on AWS management subnet CIDR block or any other IP range already in use for services in VMC.“. Secondly, the part where it states “Enter the Prefix Length and the Gateway IP address”
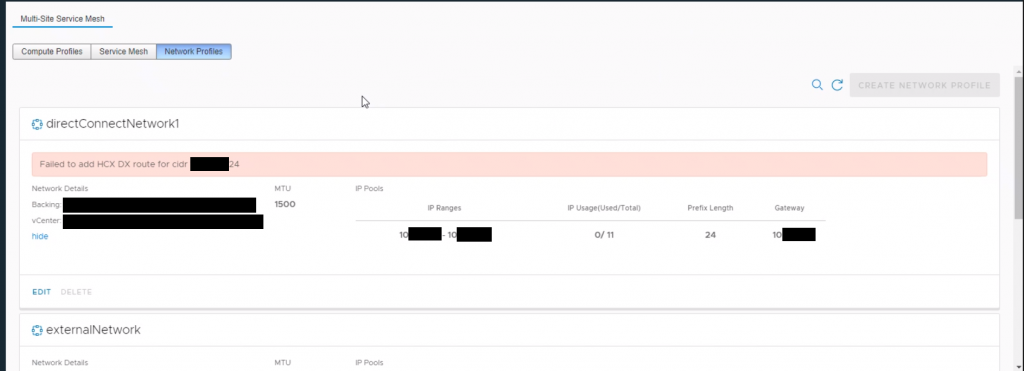
Let’s discuss the Caution element first. It seems quite clear – ensure that the range is not used either within the SDDC or any other services in use within VMC. This seems fairly obvious because this network will end up being advertised by BGP over the DX. What isn’t so obvious is that this range must not exist as a user created NSX-T/SDDC segment already. The reason for this is because once you define the DX network profile, in the background there is some automation which takes place and it creates a new Segment which is hidden from the user. If one already exists with the same CIDR range you’ll get an error message when saving the segment profile:
Secondly the documentation asks you to enter the Gateway IP address. The first time I read this I thought great, what IP address? Where do I get it from? How do I know what gateway address to add here?
The answer is nothing! You don’t need to enter anything for the Gateway or DNS addresses. Pretty much everything that’s system configured within a VMC SDDC uses .1 as the default gateway. I can only guess that it is using .1 when it’s blank but it must use something, because it needs a L3 gateway to be able to talk to the source (or destination) IX appliance. My recommendation would be to just leave it as blank and avoid using the first 10 and the last 10 addresses of the CIDR range you specify.
Once correctly set up, if you head to the SDDC Console within VMware Cloud Services, under DX you will see that this network is advertised over BGP and checking the Segments it is not listed.
I’m not sure why this isn’t explained a little more in our public docs so I thought I’d create this and it may help someone in the future.
1 thought on “How to configure HCX within VMC on AWS to use an AWS Direct Connect”