I previously blogged about my SuperMicro based homelab. It performed without issue, however, I was concerned about noise and heat output from the little servers. Had I power and networking available in my garage I might have put them in there but that wasn’t an option. Keeping them cool throughout the winter wasn’t much of an issue, but here in the UK we don’t usually have AC installed into our homes, so I knew that one spring arrived heat might become a real issue. Since they had to go in a room in the house it made that room (and the rest of upstairs) pretty warm. They are too noisy to have in the same room (for me, anyway), so I pretty much lost lost an entire bedroom/office to them.
Enough is enough I thought, so I spent a fair chunk of money on a new AMD Threadripper 3960X based system with 256GB of RAM. I already had a gaming PC, based on an Intel 8086k, so that made may and the plan was to use the Threadripper system as both my gaming PC and my homelab. I’d be transferring over all of my watercooling equipment, so temperatures would remain cool and noise kept to a minimum. The funds from selling my old SuperMicro servers and the Intel components (motherboard, RAM and CPU) made a good chunk of the budget for the new system. I haven’t done any real maths yet (I daren’t!) but applying some man maths it’s worked out well.
I’ve not had an AMD system for about 18 years, having been mainly into PC gaming and Intel has been king for such a long time. But the fact is, not much in the Intel lineup can match the Ryzen 3 based offerings, when you consider all factors such as price and power consumption. Sure, single core performance on Intel CPUs such as the 9900K are still ahead of AMD, but not by much. I felt confident that with my use, I wouldn’t notice any difference at all. I am after all a casual gamer and not a pro/streamer! I built the new PC and eagerly tried a few games out and I am pleased to say I had no issues. Now, if I could configure a nested setup in VMware Workstation and have good performance, I’d have the best of both worlds, right? Sadly, I was wrong.
The plan was to to build 4 or more nested ESXi hosts, configure vSAN using two NVMe SSDs that I have which perform really well and build my lab in that. When I’m not using the lab, simply suspend the nested hosts and resume them when required. In practice it worked great. Frustratingly, even with a 10 Gbit NIC in the PC which Workstation was bound to, I struggled to get any decent iperf3 results directly between the PC and the nested hosts; sometimes breaking 1 Gbit was a struggle. It wasn’t just network throughput, I have various problems such as deploying OVF templates into the cluster timing out, generally lacklustre performance and an overall feeling that I’d taken a step backwards.
I looked into reasons why and I found a few posts on the VMTN forum which suggested that in general VMware Workstation is not suited for this sort of task, and others who suggested there is a 1 Gbit physical cap built into the application. Whether that’s true or not I don’t know and I had no intention on spending any more time on it, so I decided that I should try and install ESXi directly onto the PC, then using the two NVMe SSDs as datastores which would form the basis for vSAN disks on the nested hosts.
I initially tried to install vSphere 7.0 however it wouldn’t pick up my 10 Gbit NIC – an old Mellanox ConnectX-2. Since I use my QNAP NAS as part of my lab (for backups and general storage), I wanted this NIC to work. I tried various drivers and I also tried newer firmware for it, but after a few hours I gave up and installed vSphere 6.7 U3 and the NIC appeared straight away. That means that in the future I may have to buy a newer NIC in order to upgrade the host to vSphere 7 – yet more spending!
*** Edit 04/05/2020 ***
Fellow vExpert Jon Howe pointed me in the direction of the Intel X520-SR1 NIC which works perfectly with ESXi 7.0 – thanks Jon! They are relatively inexpensive, I picked up a second hand one for around £30 here in the UK.
***
After some tinkering with MTU settings, promiscuous mode and forged transmits (set to enable on the main host if you don’t know), I finally saw close to line speed performance over the network, not only from the host PC, but also from the nested hosts to my NAS. Brilliant!
The next step was to do some testing with backup speeds as this is one area which was woefully slow before. Well, they’ve gone from ~60 Mbps to close to 200 Mbps. The general feel of the lab is now much faster and smoother than before. Also, the annoying OVF issue I had is no more.
The PC still functions as a Windows 10 workstation as well, I just have to boot normally for that. And to boot into vSphere I choose the USB stick via the BIOS boot selection screen. So once I have finished in my lab, I simply suspend all the guest VMs (the nested ESXi hosts) and then reboot the PC to get back into Windows ready to frag people (or get fragged!). Excellent, things are looking really well.
There are lots of benefits to a nested lab, for example if I want to test out how it performs with fewer hosts with more resources, I just deploy some new nested hosts and vMotion into a new cluster containing the new hosts. This is storage limited of course so I may need an additional NVMe SSD to really experiment down the line. I can then move the other way to more hosts with fewer resources and smaller vSAN disks. I could also build a VCF based lab if I want and either run consolidated or have two dedicated management hosts with high specs and a lot of workload hosts with fewer resources. It’s all extremely flexible and with the Veeam backups (and ESXi templates) living on my NAS, I can recover the whole lab very quickly. I’m especially looking forward to trying William Lam’s Automated vSphere 7 and vSphere with Kubernetes Lab Deployment Script once I am finished with my own experimentation and testing.
To finish off, I thought I would run through the specs of the host PC and I will add some pics later. I’ll also share my current BOM. I would put prices however what I paid and what parts cost today are different amounts, so I’m not sure that would age well.
- CPU – AMD Threadripper 3960X
- Motherboard – ASUS AMD Threadripper ROG STRIX TRX40-E GAMING
- RAM – Corsair Vengeance LPX 64GB (2x32GB) running at 3000 MHz (four kits)
- GPU – not applicable but if there are any gamers reading it’s a 2080 Ti with a waterblock
- NIC – Mellanox ConnectX-2
- Storage – Samsung Evo 960 1TB and Sabrent 2TB
I didn’t have to change any settings in the BIOS to get ESXi installed, it went straight on thankfully. On the main host I currently have 6x nested ESXi VMs, each with the following specs:
- 4 vCPU
- 32GB RAM
- 2x NICs
- 50 GB vSAN Cache
- 220 GB vSAN Capacity
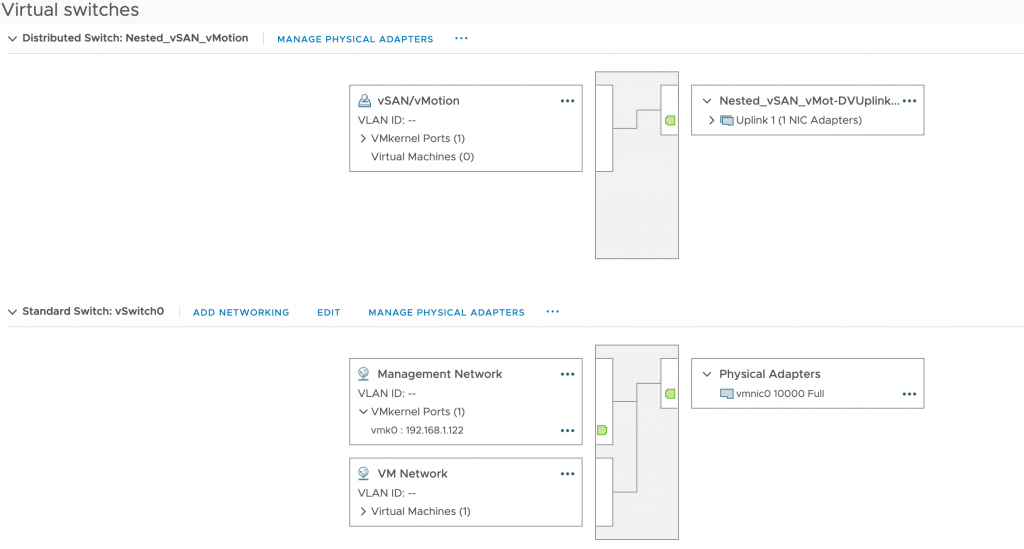
The physical host has two Standard Switches, one connected to the Mellanox uplink and one which is internal only. The one connected to the physical network acts as management and the VM network while the internal switch caters for vSAN and vMotion traffic. Both switches are set with an MTU of 9000 as is the vSAN and vMotion vmk interface.

On the nested hosts I have a single Standard Switch per host, configured for management and VM traffic which is bound to vNIC 1 and in turn the physical network, and then I run a Distributed Switch for vMotion and vSAN. There’s really no need to do this, a Standard Switch would suffice. I just wanted to experiment a little. This dvSwitch is connected to vNIC 2, which on the physical host side connects to the internal only network. Again, MTU is configured to 9000 on the switches and on the vSAN/vMotion vmk interfaces.
I have also added in the physical host to the vCenter inventory so I don’t have to keep switching to the host client if I want to make any changes.
Here’s a view of the current vCenter inventory:
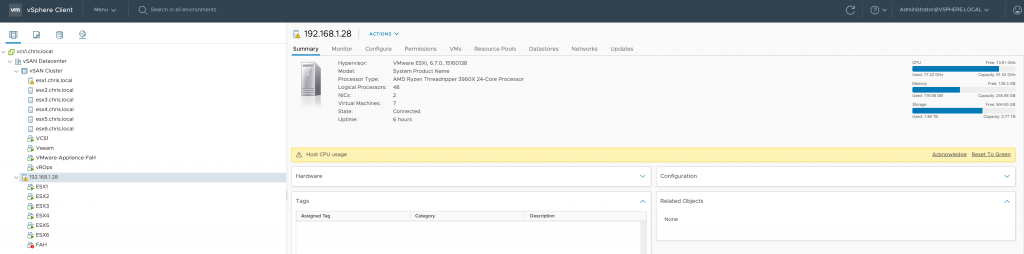
You may notice that the physical host has high CPU utilisation. The reason behind this is Coronavirus/COVID-19 – and I’m not sure I could write a post without mentioning this awful situation we find ourselves all in. For those not aware of the Folding @ Home project, essentially it’s the willingness of the general public to give up CPU resources in order to compute folding of proteins in order to understand the virus more and hopefully find a cure. Take a look at the Folding @ Home website to learn more as it will explain it a lot better than I ever will. VMware are joining in to help and have configured a Folding @ Home appliance, which you can read more about here.
Please, if you have any CPU capacity spare at home or in work, then put it to good use at the expense of a minor increase to your electricity bill.
Stay safe and thanks for reading.